Create Wireless AP on Linux PC in 10 minutes
Creating a wireless access point aka WiFi AP is relatively easy. A typical PC usually has at least one networking device or maybe two. One would be an Ethernet device while the other would be a WiFi device. If the ethernet device is tethered into the router already, this leaves WiFi device unused as in my case. Instead of leaving it in a useless state, I choose to create a WiFi AP out of it.
Okay, maybe it might take more than 10 minutes for somebody else because it all depends on whether or not they have the software tools that are needed for this process. Adding time to build the tools will certainly makes it longer than 10 minutes mark. All the tools needed are readily available in the OpenSource community.
Hardware requirment
An ethernet device. 10/100/1000Mbps is common.
A wireless device. Verify with command iw list that AP mode is supported. The faster WiFi chip, the better.
A router that connects to service provider for internet access. This will use to verify the internet access of the wireless AP later. This router is normally connected to DSL modem or Cable modem in a typical home environment.
A Linux PC, of course. This is the base platform to host this process.
Linux Kernel requirement
Most of the stock Linux distribution will have ethernet bridging and netfilter already built and installed. If this is not the case, these configurations need to be enable. I enable these features since I build and customize my own Linux PC. For this exercise I use the released distribution Slackware 14.2 (linux-4.4.14) that has all the pre-built kernel features.
Required software packages
Aside from the kernel requirements, these are the required software packages:
Bridge utility, bridge-utils. This package offers brctl utility to create networked bridge devices. I use bridge-utils-1.5 for this process.
dnsmasq utility, dnsmasq. This package offers DHCP,DNS service to the small network infrastructure. Only DHCP feature is needed for this process. I use dnsmasq-2.76 for this process.
hostapd utility, hostapd. This package is an access point daemon, hostapd. It offers authentication services between host PC and wireless clients. I use hostapd-2.4 for this process.
iptables utility, iptables, a netfilter utility. Most usually included in the distribution. iptables-1.6.0 is included in my distribution.
wifi utility, iw, to set/get wifi networking device. iw-4.3 is included in my distribution.
Bridge utility, dnsmasq, hostapd are not usually included with the distribution. In that case they needed to be downloaded then build for this process or just install the binary packages if they are available.
The configuration of my network
eth0, an Intel E1000e Ethernet of my PC connects to the router that connects to the DSL modem which gives me the internet access.
wlan0, an Atheros AR9300 Rev:3 (TP-LINK). Not used before, but it is to be made into a wireless AP. This is a PCIe HBA that I added to my desktop PC. I do not remember how long ago I had it in the PC. It must be at least 4-5 years old or more. I think it is an 80211n HBA, definitely not an 11ac.
Summary of process
Create a bridging device, say br0 (or any name). I prefer bridge device option since it is extensible, for example, if I have a second ethernet card, say, eth1, I can bond it to the bridge and become part of the AP network and governed by the same IP tables rules, less headache later.
Bond wifi device, wlan0 to the br0 bridge device.
Verify to make sure that the WiFi device, wlan0, is at the right regulatory domain. My wlan0 comes up in what I think is Australia domain (AU). I need to set it to US-FCC domain. This is important or the WiFi may not work correctly due to its frequency assignments and its Tx/Rx power settings that vary by region of the world.
Enable IP forward. Usually this is off by default.
Enable bridge device.
Run dnsmasq daemon to service DHCP/DNS with the right configuration.
Run hostapd with the right configuration ie.. authentication security settings.
Set up IP tables for devices forwarding and masquerading.
Details in step-by-step
It is better to login as root to do this as I am doing it manually instead of putting it in a shell script. Once I login as root,
-
First this is my network devices. Wireless device would not show up if Linux kernel is not supported it. In that case, the vendor's driver will need to ported, compiled, and loaded.
cat /proc/net/dev
Inter-|   Receive                                                |  Transmit
 face |bytes    packets errs drop fifo frame compressed multicast|bytes    packets errs drop fifo colls carrier compressed
    lo:    1504      22    0    0    0     0          0         0     1504      22    0    0    0     0       0          0
 wlan0:       0       0    0    0    0     0          0         0        0       0    0    0    0     0       0          0
  eth0:  364234    2479    0    0    0     0          0         0   350453    3161    0    0    0     0       0          0
-
Set regulatory domain of wlan0 to meet US FCC regulation (in my case) and set WDS mode,
#iw reg set US
#iw dev wlan0 set 4addr on
The regulatory domain is important because it is used for the setting of radio frequency allowed in the host country. WiFi driver or firmware will use it for radio calibration settings that is needed for Tx/Rx power limit, frequency channels allowed.
-
Create bridge br0, and add wlan0 interface to bridge,
#brctl addbr br0
#brctl addif br0 wlan0
#
#brctl show
bridge name     bridge id               STP enabled     interfaces
br0             8000.e8de27191e83       no              wlan0
Only wlan0 need to be added. If extra eth device is available and wish to be bonded as part of the new network, it can be added as well (as LAN segment), but not eth0 since it is considered to be WAN for this setting. In another word, do not bond eth0 to bridge !
Enable IP forwarding,
# sysctl -w net.ipv4.ip_forward=1
net.ipv4.ip_forward = 1
-
Assign IP address to br0 device. I choose 192.168.11.1 for my WiFi AP.
#ifconfig br0 192.168.11.1 up
All the routing will be shared with the eth0 and will be netfiltered into it next. The IP network address 192.168.11.1 is my new bridged WiFi network.
The dnsmasq.conf is a configuration file for dnsmasq in my current directory where I start it,
1 domain-needed
2 bogus-priv
3 resolv-file=/etc/resolv.conf
4 interface=br0
5 expand-hosts
6 dhcp-range=set:br0,192.168.11.100,192.168.11.199,255.255.255.0,86400
7 dhcp-lease-max=160
8 address=/souktha.github.io/192.168.11.1
dnsmasq will serve DHCP to all WiFi clients by assigning them with network IP address 192.168.11.x . The interface for the bridge is br0 (line 4). This has to match the name of the bridge I created earlier. The DHCP address range it will give to clients will be in the range of x.100 - x.199 (line 6).
Start hostapd using hostapd.conf file which is also in my current directory. I can set up IP tables rules later. hostapd will set wlan0 to AP mode.
#hostapd hostapd.conf
Configuration file: hostapd-sedone.conf
wlan0: interface state UNINITIALIZED->COUNTRY_UPDATE
wlan0: interface state COUNTRY_UPDATE->HT_SCAN
20/40 MHz operation not permitted on channel pri=6 sec=10 based on overlapping BSSes
Using interface wlan0 with hwaddr e8:de:27:19:1e:83 and ssid "sedone3"
wlan0: interface state HT_SCAN->ENABLED
wlan0: AP-ENABLED
For this test, I do not run hostapd in background (-B) mode so I can debug if I need to. This is hostapd.conf file,
 1 interface=wlan0
 2 bridge=br0
 3 logger_syslog=127
 4 logger_syslog_level=2
 5 logger_stdout=127
 6 logger_stdout_level=2
 7 ctrl_interface=/var/run/hostapd
 8 ctrl_interface_group=0
 9 ssid=sedone3
10 hw_mode=g
11 macaddr_acl=0
12 auth_algs=1
13 ieee8021x=1
14 eapol_key_index_workaround=0
15 eap_server=1
16 country_code=US
17 channel=6
18
19 beacon_int=100
20 hw_mode=g
21 wpa=2
22 ieee80211n=1
23 wme_enabled=1
24 ht_capab=[SHORT-GI-20][SHORT-GI-40][HT40+]
25 wpa_key_mgmt=WPA-PSK
26 wpa_pairwise=CCMP
27 max_num_sta=8
28 wpa_group_rekey=86400
29 wpa_passphrase=87654321
30
31 upnp_iface=br0
32 friendly_name=sedone3
33 model_description=Slackware WiFi AP
Line 9 is my AP's SSID, sedone3. The authentication password is at line 28. Basically from line 20 down (minus a few), are the settings for security features such as key exchange, authentication mode etc..
At this point I can browse/scan the WiFi AP and I will see sedone3 as its SSID, but packets are not yet routed; however, my android tablet can connect to it.

Fig1: sedone3 is SSID of my router
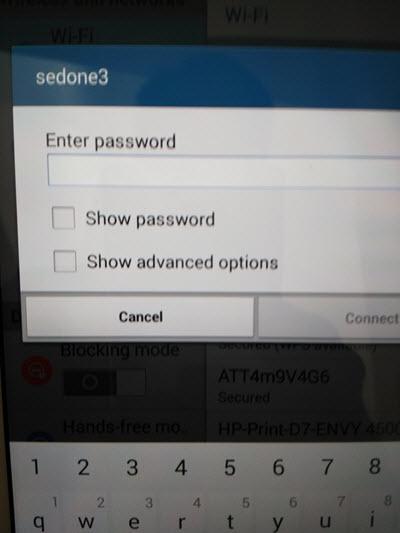
Fig2: sedone3 password prompt
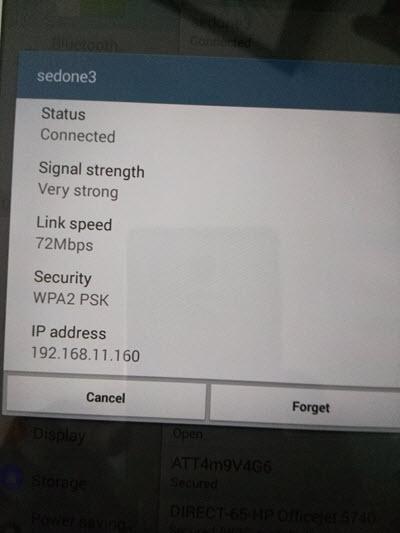
Fig3: sedone3 connected
Now set the IP tables rules for package forwarding,masquerading. This is essential to get network properly covered.
# iptables -A INPUT -i br0 -j ACCEPT
# iptables -A FORWARD -i br0 -o eth0 -j ACCEPT
# iptables -A FORWARD -o br0 -i eth0 -j ACCEPT
# iptables -t nat -A POSTROUTING -o eth0 -j MASQUERADE
# iptables -A FORWARD -o br0 -i eth0 -m state --state RELATED,ESTABLISHED -j ACCEPT

Fig4: Internet access after IP netfilter forwarding,masquerading.
The setting above is to add bridge device to the rule and forward packets between bridge device and the main ethernet device (WAN or eth0) with masquerading.
Route for the new network is shared with eth0's default gateway. There is no special setting for the route. Here is my route,
#route
Kernel IP routing table
Destination     Gateway         Genmask         Flags Metric Ref    Use Iface
default         netrouter       0.0.0.0         UG    1      0        0 eth0
loopback        *               255.0.0.0       U     0      0        0 lo
192.168.10.0    *               255.255.255.0   U     0      0        0 eth0
192.168.11.0    *               255.255.255.0   U     0      0        0 br0
The IP netfilter rules added are the rules added on top of what I already have for my local eth0 network. I did not flush my host IP tables so whatever rules I have I still keep them, just the new rules for the WiFi bridge are added. More IP filter rules can be added specifically for this network if needed.
I am not sure how many Mbps my wlan0 can reach so I leave it at default of 72Mbps. Most newer PCIe WiFi card will probably reach Gbps speed, but mine is relatively old. Perhaps it can reach in the hundreds Mbps.
The operational state of my wlan0 devices,
iw dev wlan0 info

Interface wlan0
        ifindex 3
        wdev 0x1
        addr e8:de:27:19:1e:83
        ssid sedone3
        type AP
        wiphy 0
        channel 6 (2437 MHz), width: 20 MHz, center1: 2437 MHz

iwconfig wlan0
        wlan0     IEEE 802.11abgn  Mode:Master  Tx-Power=16 dBm
                  Retry short limit:7   RTS thr:off   Fragment thr:off
                  Power Management:off
Summary
dnsmasq and hostapd do all the magic here. Unlike my other posts, I do not write a single line of code. I do not debug, perform timing closure (FPGA) or do any frustrated things. Is it hard ? Well, It takes me a lot longer to write this post than to set up the WiFi AP on my host PC. It really take 10-15 minutes to set it up since I did not spend time building the needed packages. For most Linux distribution, one can download/install the pre-built binary packages with the host package manager software, for example, Ubuntu's apt-get install <package> command. It is not necessary to build everything like I did.